Copying 35mm slides with the Moment 10x Macro lens and your iPhone.

*Update: This article has been updated with the Moment Macro T series lens.
Somewhere in a shoebox you probably have a handful of precious family snapshots on 35mm slides that you’ve thought would be great to have on your iphone. Like that one of crazy ol’ Uncle Fritz standing on the track in front of an oncoming train long before death-defying selfies were cool.
If you have a Moment Macro lens accessory for your iPhone, Galaxy or Pixel, you can easily copy these yourself. Note that the technique below has been tested on an iPhones. Results with other phones may vary.
How to copy slides with your iPhone.
The process is fairly simple:
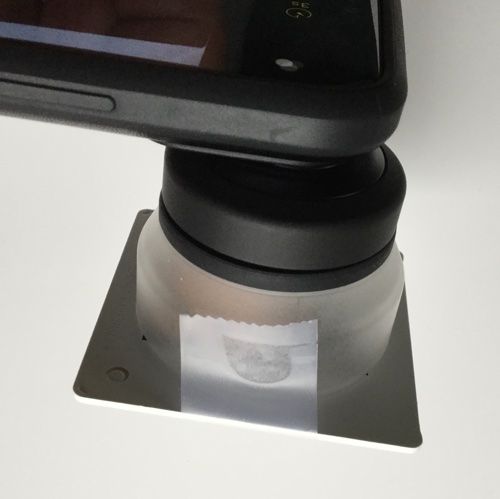
- Attach the Moment 10x Macro (with diffuser hood) onto your Moment iPhone case or universal mount. It’s useful to wrap your diffuser in black tape to block ambient light coming in through the diffuser. You can also block it with your hand, as I did here.
- Clean your slide with film cleaner and a can of compressed air like Dust-Off. The cleaner the slide is, the less retouching will be required later. Pec makes excellent cleaning stuff.
- Tape the slide horizontally against the diffuser and orient the camera horizontally. I used a piece of scotch tape at the top and bottom, as shown in the photo above.
- Hold the phone over a softly-and-evenly lit sheet of white paper. Be careful not to create shadows on the paper with your body or the phone. I’ve found diffused window light on an overcast day to be best.
- Zoom out by pinching the screen until the edges of the slide mount are cropped out.
- Snap the shot.
- Examine the image to decide if you need to shoot another at a brighter or dimmer exposure. If so, drag the slider next to the focus frame to adjust and shoot again.
Editing the photo.
Your photo will likely benefit from editing:
- Scratches, dust and dirt are problems, even with a well-cleaned side. Touch Retouch is an excellent app for your iPhone that can fix these.
- Exposure If the slide was properly exposed when it was shot, iPhone’s Smart HDR usually does a good job of capturing a decent exposure. Sliding the Brilliance slider left or down can help restore lost punch.
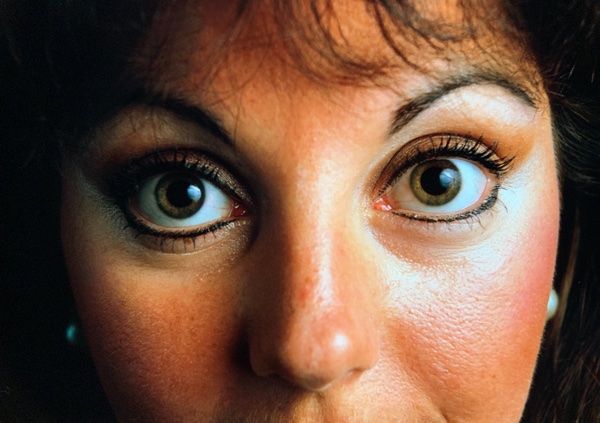
- Color correction With old transparencies you can run into discoloration, fading and tint issues that the simple tools of the Photos app struggle with. The example slide of the girl’s eyes was shot in 1985 with Fujichrome 100. In the copy, the white wound up as slightly green and needed to be corrected with the Tint slider. Try the iPhone Photos app’s magic wand and slider first. You’ll often find that the Tint and Warmth sliders will correct one color, but cause problems with others. You sometimes have to chose your battles and correct for the most important color, making the other color issues less obvious.
- Film grain is the analog equivalent to digital noise. Unfortunately, it can be enhanced by the duplication process. Kodachrome slides (which are actually three layers of black and white film that are dyed color) have a substantial amount of visible grain. The Photos app has a noise reduction slider that can tame film grain.
- Sharpening You’ll be shocked at how many of those old slides are out of focus, even those taken with an SLR. The Photos app’s sharpening tool is a good place to start, but don’t expect miracles: If a slide starts out blurry, the copy will be blurry, no matter what you do.

How do the results compare?
I was really shocked at how good results can be when an iPhone and Moment Macro are paired with a sharp slide, as seen in the copied image above. I have a Wolverine Film to Digital Converter that copies with a 20mp-sensor and fixed-lens that sells for about $150. The 12mp images I’m getting from my iPhone Xs Max and the Moment Macro look sharper and have a smoothness that’s more true to the original than I get with the Wolverine. There are print scanners that can do slides at a higher resolution than the 12mp iPhone camera, but you’d have to step up to the $1,000 Epson Perfection for that. A quality, dedicated film scanner can cost even more.
There’s also the option of professional slide scanning services. But be careful of what they offer: Often the resolution is lower than you’d get from your iPhone. (The final resolution of a copy from a 12mp iPhone camera is 4032 x 3024 pixels.)
It’ll be tough to find an easier and less-expensive way to get sharp copies of your vintage slides than you can get with the Moment Macro. They look nice and crisp on your phone or iPad and can be printed sharp up to 8”x10”. And wouldn’t it be nice to have a print of Uncle Fritz on your wall as a constant reminder of how the gene pool weeds itself out?
Read more on iPhone photography

Get the definitive book for mastering your iPhone camera: The Crap-Free Guide to iPhone Photography
