 wolfe with an e's blog
Taking Handheld Blurs With Your iPhone
This article explains how iPhone’s Live Mode can be used to create images of moving subjects like waterfalls against still backgrounds. It includes a step-by-step how-to for taking blur photos with the built-in iPhone Camera app and gives you tips for taking better blurs with this method.
The iPhone’s computational photography continues to get better and better. A big advantage for iPhoneographers as the photo quality or our iPhones pushes deeper into professional territory: The need for professional accessories gets less and less. I used to carry around multiple lens attachments, fill lighting and a tripod when I went shooting. But now, usually the only extra I carry around is a Moment 10x Macro Lens, since the iPhone can do the rest without the gizmos
Goodbye Tripod
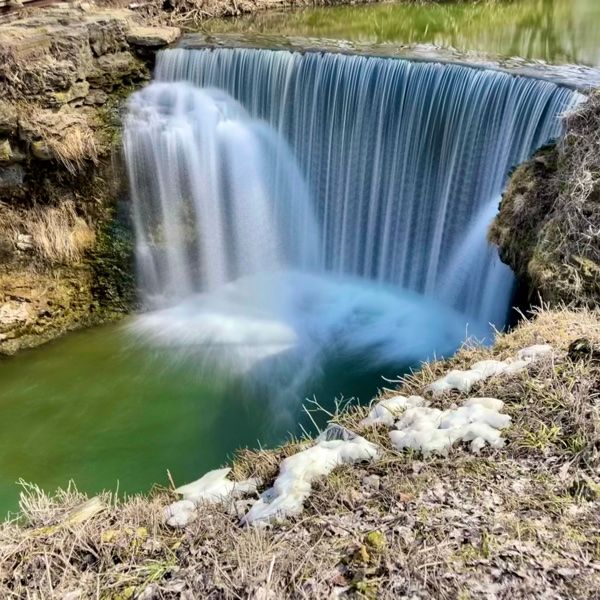
There are instances where I still use a tripod, like time lapse. But generally, three-second exposures that used to require a tripod a can now be handheld. While my iPhone 12 Pro Max has optical image stabilization, the real trick to this is the Live Photo Blur effect. As seen in the example, this blurs any objects that are moving in a scene (like the waterfall) and keeps the what’s not moving still.
How Live Photo Works
Live Photo is not one image, but a series of up to 30, full-quality photos taken over three seconds: half of them before you trip the shutter and the over half afterwards. (The GIF above shows the full clip.) What’s happening is that your iPhone is shooting a short movie clip at full photo resolution. Your iPhone then chooses what it thinks is the best image of the clip based on composition, sharpness, exposure etc., and shows you that image. This is great for shooting sports, kids, pets, wildlife: anything that moves a lot. You also have the ability to view all images in the clip and choose your personal favorite by tapping Edit and tapping the Live icon.
A nice trick is that you also can turn this Live Photo clip into a short, GIF-style movie or merge the images to create a blur. You can see from the example that this can be very effective for time exposures without a tripod.
What’s Going on Here?
The iPhone is taking some or all of the images and merging them by aligning the still parts. So even if you’ve moved a bit, the still areas of the image will come out sharp while the areas with motion will blur.
How to Shoot a Blur
There’s really not a lot extra you need to do to shoot a blur.
- Make sure Live Photo is on. If the target icon on the top right (vertical) or top left (horizontal) has a line through it, tap it to turn Live Photo on.
- Shoot the image normally holding the iPhone as still as possible.
- Tap the preview image on the bottom left (vertical) or bottom right (horizontal).
- Pull up on the image. This shows you the Live effects.
- Flick the Effects row to the left.
- Choose Long Exposure.
You can also tap the Edit button and use the video cropper to manually control which frames are used in the blur. Sometimes reducing the number images will improve resolution.
Taking Better Blurs
One thing you’ll immediately notice about blurs is that they’re cropped. Only the areas that are present in all images used in the merge will be shown. The key to better blurs is holding the camera as still as possible for the full three seconds of exposure. With that in mind:
- Hold steady on the scene both before and after you trip the shutter. If you move the camera just before or after you shoot, some of the frames won’t align and will be discarded. If you’re still through the whole clip, your iPhone will have more images to work with for improved sharpness in the still areas and deeper blur in the moving area.
- Avoid camera shake. Hold the phone with both hands, breathe out slowly when you shoot, brace yourself or the iPhone against something and gently tap the shutter or gently squeeze either volume button. The steadier you are when shooting the clip, the less cropping your iPhone will need to do.

Get the definitive book for mastering your iPhone camera: The Crap-Free Guide to iPhone Photography